I Spy bags are beanbags made with little toys/buttons/beads inside and a small viewing window to find all the little toys inside. The child manipulates the bag to find all the items inside. It's a great quiet activity to keep little ones sitting tight for a little while, keeping hands busy doing something positive.
When I researched for directions, I found that some people make them about 4 inches, which seemed way too small, and others made them about 7 inches, which seemed about right. I made a 4 inch one to start with, figured I would make it for my little girl and get the kinks out on that one.
I used a small remnant of polar fleece, and put in a few small items and the letters to spell out the little one's name. I thought a circle would be easier to sew around and i wou
 ldn't have to worry about getting it set squarely in the middle of a fairly small square. I was wrong there, and I also lost my photo with all the pieces inside for making the label for things to look for. She's 2.5, so she really didn't mind.
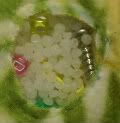
Here's a close-up of the viewing window. I've since washed off the marker I used to draw the circle, and trimmed a little closer, so it does look slightly better, if not entirely circular now.
Below is the finished product. I stitched around the outside and used pinking shears to trim the edges. I think this made it a lot easier to make, without having to turn it and hand stitch the opening closed. This one turned out ok, though I think the sharp-edged screw was probably a bad choice for a pre-schooler's toy.


The next project I tried was a 7-8 inch bag. I think I cut the fabric at 8 inches, but with 3/8 inch seams all around. I used some fleece for a local sports team and tried to get the logo in. Since it had an argyle pattern, I decided to use one of the little diamond shapes as the viewing window. The first one, I stitched around three sides of the bag, then remembered I hadn't done the viewing window first. I went back and did the window without it stitched together. It's tough to see here, but the whiter square is where I've sewed the plastic in and cut away the fabric on top.
Next I chose the items to go inside. I used mostly beads, and some buttons from the craft store, along with a few random things to fill out the bunch. The letters spell out "Go Hawks."

I stitched the two sides together, filling it with the filler items and poly pellets, then again cut around with pinking shears. I thought I would like the larger size better, but it seems that the smaller size is better suited for little hands. The big one is also pretty heavy and I think it could easily stretch out the fleece and become misshapen. I think I'll go smaller in the future. Here's the picture of the finished project, do you spy a soccer ball?


3 comments:
Being from U of I we LOVE hawkeyes!! Good job!!!!
mom0102020507
I always aspired to make these but never actually followed through. Yours look VERY nice!
they are very easy to make! the pinking shears make up for any crookedness in the seams.
Anon, ;) we're deep in Cyclone country, but this piece of fabric was about 80 cents, so i bought it.
Post a Comment